When it comes to riding an electric bike, the battery is often the one thing that makes or breaks the experience. Store-bought packs are convenient, but they don’t always match your frame, your range needs, or even your style of riding. That’s where custom ebike battery comes in.
Over time, I’ve read a bunch of guides and also built a few packs myself, so here’s a mix of structured info and personal trial-and-error stories.

1. Why bother with custom ebike battery
The main reasons are pretty clear:
- Fit – you can shape the pack to slide neatly inside your frame or rack space, instead of forcing a bulky brick into an awkward spot.
- Flexibility – choose your own voltage and capacity depending on whether you want speed, long range, or just a balance of both.
- Quality control – you pick the cells, BMS, and wiring. Done right, it can outlast cheap factory packs.
The flip side? It can cost more than an entry-level ready-made battery, and you take on the risk of safety, wiring, and repairs.
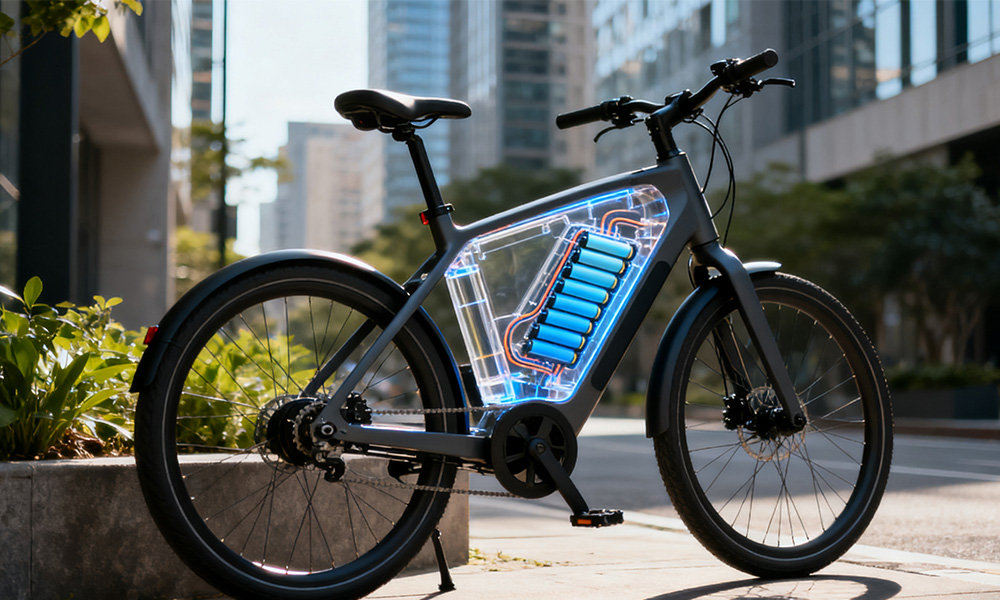
2. Key parts of a custom ebike battery
Here’s what really matters when you start building or planning:
| Part | Why it matters | A quick tip from experience |
|---|---|---|
| Cells (18650, 21700, LiFePO4, etc.) | Energy density, discharge rate, safety, and lifespan differ a lot. | I once used cheap cells with low discharge ability—looked fine on paper but sagged badly on climbs. Upgrading to stronger cells fixed it. |
| Voltage | Controls how fast your motor can run, and must match your controller. | Too high can fry electronics, too low wastes potential. Stick to your motor’s rated range. |
| Capacity (Ah) | Bigger = longer range, but heavier. | Always add a little margin. Real-world range is usually less than specs. |
| BMS (Battery Management System) | Protects from over-charge, deep discharge, heat, short circuit. | Don’t cheap out. I used an undersized BMS once—it overheated under heavy load. |
| Casing | Protection from bumps, water, and heat. | My first build leaked water during rain. Fixed it later with sealing strips. |
| Wiring / Connections | Must handle current safely. | Thin wires get hot, cause voltage drop. Always overspec a little. |

3. Steps to build custom ebike battery
- Define your needs – Write down your commute distance, hills, and load. Decide on target voltage and range.
Example: I planned for a 30 km ride with hills, so I went 48V and aimed for ~25–30 km real range. - Design the pack (series × parallel) – Voltage = series count, capacity = parallel count. Make sure each cell’s current rating isn’t exceeded.
- Choose BMS & safety parts – Match voltage, allow extra headroom in current rating. A temp sensor helps a lot.
- Assembly – Spot welding nickel strips is more reliable than soldering. If soldering, keep heat low to protect cells.
- Enclosure & thermal management – Think shock resistance, waterproofing, and ventilation. A mix of plastic + aluminum can balance weight and cooling.
- Testing – Don’t just slap it on the bike. First do controlled charge/discharge cycles, then small road tests. Adjust if it overheats or range feels off.
4. Safety and common mistakes
- Fake or poor-quality cells – Specs look amazing, but they sag fast or die early. Source carefully.
- Poor heat management – A sealed box with no airflow = hot pack and short lifespan.
- Underrated BMS – Looks fine until you sprint uphill and suddenly it cuts out.
- Voltage mismatch – Wrong pack voltage fries controllers or just runs inefficiently.
- Ignoring waterproofing and vibration – Real roads aren’t clean labs. Water and bumps kill bad welds fast.

Final thoughts
A custom ebike battery can give you the freedom to ride farther, climb stronger, and fit your bike perfectly—but only if you take the time to plan and build carefully. Done right, it’s worth every hour you put in. Done sloppy, it’s a safety hazard.
So: measure twice, weld once, and always test before trusting your build on a long ride.
Leave a Reply