Building 18650 lithium battery pack with Battery Management System (BMS) not only meets specific power requirements but also deepens your understanding of battery technology. Whether powering small electronic devices or working on DIY energy storage project, this process offers both practical value and engaging hands-on experience. In the following section, we’ll explain in detail how to build 18650 lithium battery pack with BMS.
Why Choose 18650 Lithium Batteries
18650 lithium batteries are ideal choice for building battery packs thanks to their outstanding performance features. Named after their dimensions—18mm in diameter and 65mm in length—these cells offer high energy density, allowing a large amount of power to be stored in a compact size. This means you can achieve powerful energy output while keeping the battery pack lightweight and space-efficient.
In addition, 18650 batteries have long cycle life, typically supporting hundreds to even thousands of charge and discharge cycles, which significantly reduces long-term usage costs. Their stable output voltage provides reliable power to various devices.
From laptops and electric vehicles to power tools and portable electronics, 18650 lithium batteries are widely used across many industries. Their versatility and proven reliability make them trusted energy source in both consumer and industrial applications.

The Importance of a Battery Management System (BMS)
BMS plays a crucial role in a lithium battery pack—it works like the “smart manager” of the system. During charging and discharging, lithium batteries can easily face issues like overcharging, over-discharging, overcurrent, and overheating without proper management. Overcharging can cause the battery to swell or even explode, while over-discharging significantly shortens its lifespan. Overcurrent and overheating also negatively affect performance.
BMS continuously monitors key parameters such as the voltage, current, and temperature of each cell in the pack. When it detects any abnormalities, it immediately takes protective action. For example, when cell reaches the overcharge threshold, the BMS cuts off the charging circuit. When the voltage drops too low, it stops discharging. This ensures safe and stable operation of the battery pack and helps extend its overall lifespan.

Materials and Tools Needed to Build Battery Pack
18650 Lithium Batteries: Choose the appropriate number and specifications based on the desired voltage and capacity. For example, to build a 12V battery pack, you typically need 3 cells in series, since each 18650 cell has a nominal voltage of 3.7V (3.7V × 3 ≈ 11.1V, which reaches about 12.6V when fully charged). Always use cells from the same batch with similar performance to ensure consistency across the pack.
Battery Management System (BMS): Select a BMS that matches the voltage and current ratings of your battery pack. Make sure it can handle the pack’s maximum charge and discharge current and includes all necessary protection features.
Nickel Strips: Use these to connect the cells. Nickel has excellent conductivity and weldability, ensuring strong and reliable connections between batteries.
Spot Welder or Soldering Iron: A spot welder is the best tool for attaching nickel strips to the battery terminals quickly and securely. If a spot welder isn’t available, you can use a soldering iron—just be careful with heat and duration to avoid damaging the cells.
Battery Holders: These hold the cells in place, keeping the layout neat and preventing movement or collision during use.
Insulation Materials: Items like heat shrink tubing and electrical tape help insulate the welded areas and the entire pack, reducing the risk of short circuits.
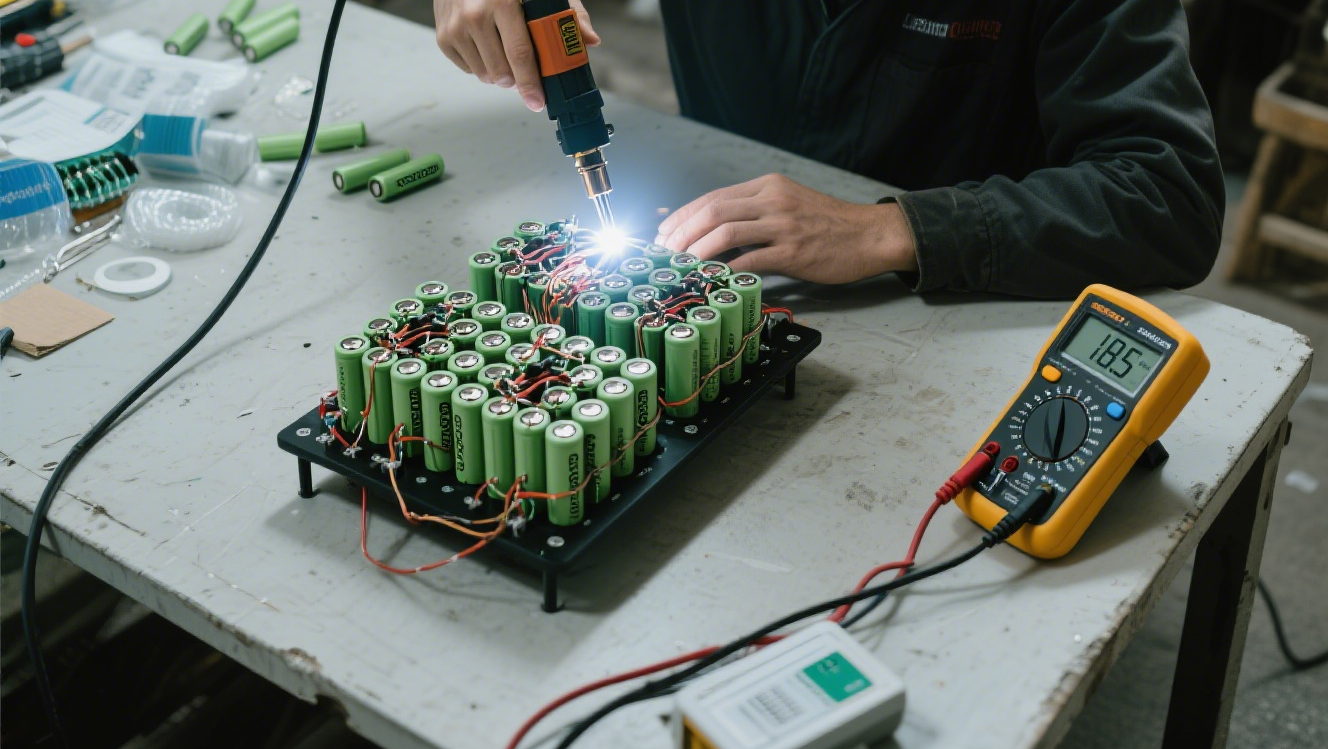
Multimeter: Use this to check voltage, current, and other parameters during assembly and testing to ensure everything works as expected.

Assembly Steps
Cell Selection and Preparation
Use multimeter to measure the voltage of each 18650 lithium cell and make sure the initial voltages are closely matched. Cells with large voltage differences can reduce overall pack performance and lifespan. A voltage difference within 50mV is generally recommended.
Check each cell for physical damage, swelling, or other abnormalities.
Group the selected cells according to your design plan and get them ready for connection.
Battery Connection
Determine the series and parallel configuration based on the desired voltage and capacity. Connecting cells in series increases voltage, while connecting them in parallel increases capacity. For example, three cells in series provide about 11.1V. To increase capacity, multiple series strings can be connected in parallel.
Use nickel strips to connect the cells. If using a spot welder, cut the nickel strips to the right length, place them on the cell terminals, and weld them in place. Make sure each weld is solid and secure, with no cold joints.
If using soldering iron, apply small amount of flux to the nickel strip and battery terminal. Then melt solder onto the connection to bond the strip and terminal together. Keep the soldering time as short as possible to avoid overheating the cells.

BMS Installation
Follow the BMS manual to connect it correctly to the battery pack. A typical BMS includes positive and negative terminals for input/output and a set of balance leads for monitoring the voltage of each cell.
Start by connecting the BMS’s main positive and negative wires to the battery pack’s output terminals. Make sure the connections are secure.
Next, connect the balance leads in order to the positive terminals of each cell in the series. Be careful with the sequence—incorrect wiring can cause the BMS to misread cell voltages or fail to function properly.
Insulation
Use heat shrink tubing or electrical tape to insulate all soldered joints and exposed metal parts. Slide heat shrink tubing over the areas to be insulated, then apply heat with a heat gun or lighter so the tubing shrinks tightly around the surface. If using electrical tape, wrap it firmly and evenly with no gaps.
Inspect the entire pack to ensure every potential short-circuit point is well insulated.
Testing and Tuning
Use multimeter to check the total voltage of the battery pack and verify it matches your expectations. For example, a 3-cell series 18650 pack should read close to 12.6V when fully charged.
Connect a suitable load—such as a light bulb or resistor—to perform a discharge test. Observe how the pack operates and whether the BMS activates protection when needed. During discharge, the BMS should monitor each cell’s voltage, and once the voltage drops to the over-discharge threshold, it should cut off the output automatically.
Perform charge test using a compatible charger. Watch the charging process to confirm it works correctly and ensure the BMS stops the charging automatically once the pack is full.
Important Notes
Prioritize Safety: Always avoid short circuits during assembly. Keep metal tools from touching both battery terminals at the same time. Wear protective gloves and safety goggles during operation to prevent accidents.
Choose the Right Materials: Make sure all components—18650 lithium cells, BMS, nickel strips, and others—are high-quality and meet relevant standards. Low-quality materials can compromise both the performance and safety of the battery pack.
Follow Proper Procedures: Whether using a spot welder or soldering iron, always operate the tools according to the manufacturer’s instructions. Control welding time and temperature carefully to avoid damaging the cells.
Maintain the Battery Pack: After assembly, regularly check and maintain the battery pack. Use a multimeter to monitor voltage, capacity, and other key parameters. Detect and resolve any issues early. Also, store the battery in a proper environment—avoid heat, humidity, or other extreme conditions.
By following these steps, you can successfully build 18650 lithium battery pack with BMS. Along the way, you’ll not only gain valuable hands-on assembly skills but also develop a deeper understanding of how battery management systems work—providing a reliable power solution tailored to your energy needs.
Leave a Reply