
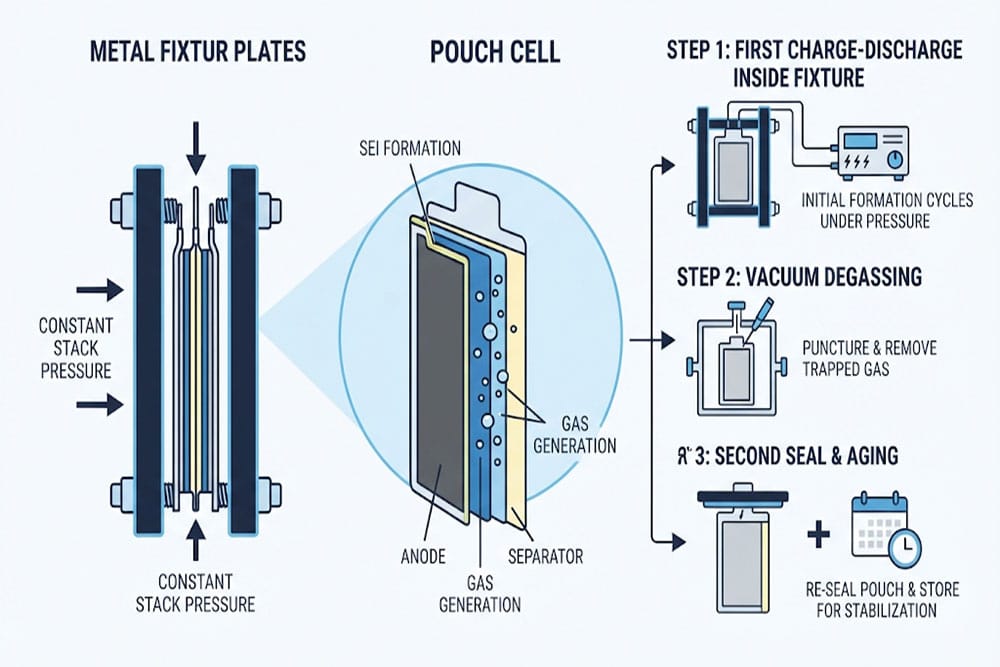
A pouch cell that just came off the sealing line is not a battery yet. It is a sandwich of electrodes, separator, and electrolyte that has never been charged. Everything that makes it a working, safe, long-lived cell happens during formation—the first controlled charge-discharge cycle. Get formation right and the cell delivers thousands of cycles. Get it wrong and no downstream process can fix it.
If you buy pouch cells for a product line, you will never watch this step happen in the factory. But its quality shows up everywhere you can look: in capacity consistency, in self-discharge rates, in how quickly packs swell in the field. This guide explains the lithium ion pouch cell formation process step by step, and shows what to check in a supplier’s cells to judge whether their formation is under control. For the basics first, see our simple guide to what a pouch cell battery is.
Why Formation Decides the Cell’s Future
During the first charge, lithium ions leave the cathode and insert into the graphite anode for the very first time. As they arrive, part of the electrolyte decomposes on the anode surface and forms a thin passivation layer called the SEI (solid electrolyte interphase). This layer sounds like a defect, but it’s essential: it conducts lithium ions while blocking electrons, which stops the electrolyte from continuously breaking down. (If you want to start from the fundamentals, our explainer on how lithium-ion batteries actually work covers the charge transport picture.)
A dense, stable SEI gives you low self-discharge, low impedance, and long cycle life. A rough, porous SEI keeps consuming electrolyte cycle after cycle, producing gas, raising impedance, and killing capacity. The current profile of the first charge—usually a small current, then a rest, then controlled steps—directly shapes how this film forms. Formation also serves as the first quality gate: cells with internal micro-shorts show abnormal voltage behavior during and after formation, and get screened out before they ever reach a pack assembly line.

The Pouch Cell Formation Process, Step by Step
Formation is one stage inside the full production flow—we walk through the whole sequence in how lithium ion pouch cells are made. Here’s what happens inside that stage:
1. Loading Into Formation Fixtures
Pouch cells are soft. Under a real charge they swell as gas builds up and electrodes expand, and an unconstrained cell forms that swelling into permanent distortion and an uneven SEI. So every pouch cell is clamped flat inside a formation fixture with a defined stack pressure—commonly between 50 and 1,500 kg depending on cell size and chemistry—and held at a stable temperature, usually 30–45 °C.
Uniformity matters more than the exact number. If one channel clamps at 800 kg and its neighbor at 300 kg, the two cells develop different SEIs and different cycle lives, even in the same batch. This is why serious manufacturers use automated fixture systems instead of improvised racks.
2. The First Charge: SEI Formation
The first charge runs at a low, carefully chosen current—often C/10 to C/20 for the initial stage. The cell is charged to a set voltage, rested to let the electrode interface equilibrate, then charged again, sometimes followed by a partial or full discharge. Many producers also add a high-temperature hold during this stage to densify the SEI.
Process engineers tune this recipe per chemistry: an NMC cell and an LFP cell don’t want the same profile. If you’re still deciding between the two chemistries for your project, our NMC vs LFP pouch cells comparison covers the trade-offs that also drive these recipe differences.
3. Degassing
The first charge generates gas inside the pouch: electrolyte decomposition products, mostly CO₂, CO, H₂, and hydrocarbons. A pouch cell with trapped gas has poor interface contact, hot spots, and a bulged profile that won’t fit module tooling.
So after the initial charge, cells move to a degassing station. The machine punctures the reserved gas pocket inside a vacuum chamber, extracts the gas, and the cell moves immediately to the second seal.

4. Second Seal
Degassing leaves a puncture hole, so the cell is re-sealed—the “second seal”—with the sealing bar cutting off and fusing the gas pocket area. Seal quality here is a leak-risk point: temperature, pressure, and dwell time of the sealing bar need to be verified, typically by a burst or leak test sampling plan. The sealing techniques involved are the same heat sealing and edge sealing methods described in our pouch cell sealing guide.
5. Aging and Grading
Re-sealed cells rest on racks or in temperature-controlled rooms for hours to several days. During aging, engineers measure open-circuit voltage (OCV) at two time points and calculate the voltage drop. A cell with a soft short discharges itself measurably faster than a healthy one, so the K-value (mV per unit time) becomes a pass/fail criterion. Cells also get their capacity graded here—hence “formation and grading“—so that the shipment matches the capacity grade the customer ordered, down to the mAh and Ah ratings specified in your purchase order.
What Buyers Should Check After Formation
You can’t audit formation remotely, but its fingerprints are easy to test on received samples:
- Capacity consistency. Grade sorting happens during formation and aging. If cells from the same batch vary beyond their stated capacity tolerance, sorting was sloppy.
- Self-discharge. Store cells for two weeks and re-measure OCV. A drop beyond a few millivolts suggests soft shorts that formation screening should have caught. Our guide on how to check a lithium-ion battery covers the practical tests.
- Internal resistance. Formation quality shows up as low, uniform impedance across cells. If you see spread, measure it properly—here’s how to calculate internal resistance of a battery.
- No swelling. Gas that should have been removed at degassing turns into swelling. The failure modes are detailed in our guide to pouch cell swelling: causes, risks and prevention.

Common Formation Problems and How They Reach You
Gas pockets after degassing. A weak vacuum or a puncture that misses the gas pocket leaves residual gas. You’ll see it as slightly puffy cells on arrival.
High self-discharge / bad K-values. Formation pressure too low, temperature non-uniformity, or contaminated electrolyte. Cells pass factory testing but lose charge in your warehouse.
Capacity spread within a batch. Current accuracy or clamp uniformity problems at formation. A spread that follows fixture position almost always means thermal or mechanical non-uniformity, not chemistry.
Bulged cells in the field. Often a sealing or degassing escape—frequently an overly aggressive first-charge current that generated more gas than degassing could remove. Any of these end up as the swelling and premature failure documented in our swelling guide above.

FAQs
Typically 1 to 3 days end to end: the first charge may take 6–24 hours, followed by rest steps, degassing, second seal, and aging of 12–72 hours. High-nickel chemistries often need longer, gentler profiles.
No universal number exists. Lab cells commonly form at 50–200 kg of stack pressure; production cells often use 500–1,500 kg, tuned per chemistry and cell thickness. What matters is uniform, measured, repeatable pressure across every channel.
Gas generated during the first charge has nowhere to go in a sealed pouch—it swells the cell. Cylindrical cells route gas into the headspace of the rigid can and tolerate small amounts without deformation, so they skip the puncture-and-reseal step.
Directly. Capacity grading happens during formation and aging, so formation consistency is what makes a “2000mAh” grade deliver 2000mAh across a shipment—see our pouch cell capacity selection guide on grade consistency vs. the label number.
At minimum: per-channel current/voltage curves, clamp pressure, channel temperature, rest times, OCV points, and pass/fail decisions—tied to cell serial numbers and exportable for traceability audits. A supplier who can’t produce this data is asking for blind trust.
Next Steps
Formation sits between assembly and final packaging, but it is where most yield is won or lost—and where most field failures are quietly created. To keep mapping the pouch cell topic:
- Go one step upstream in production: What Materials Are Used in Lithium Ion Pouch Cells? — the electrodes and electrolyte that formation chemistry acts on.
- Go one step upstream again: Lithium Ion Pouch Cell Sealing: Heat Seal & Edge Seal Guide — the sealing steps that happen right before and after formation.
- Understand the structure you’re charging: What Is Lithium Ion Pouch Cell? Structure, Working Principle & Uses — the anatomy behind the SEI story.
Ready to source cells whose formation process you can actually verify? Browse our pouch cell battery category for wholesale and OEM options—including proven designs like our 3.7V 2000mAh pouch battery—or contact the ANPS team for a custom cell quote with full process documentation.
Lithium Ion Pouch Cell Series
-

11.1V 3S 850mAh li-ion Polymer Pouch Cell Battery Pack
-

134365 4500mAh 3.7V Rechargeable Lithium Polymer Battery
-

3.7V 1200mAh Li-Polymer Pouch Cell Battery
-

3.7V 15Ah 148198 Pouch Lithium Ion Battery
-

3.7V 1S2P 3000mah lithium Polymer Battery
-

3.7V 2000mAh Pouch Cell Battery
-

3.7V 502248 500mAh Lithium Ion Polymer Battery
-

3.7V 700mAh Li-Polymer Pouch Cell Battery
-

3.7V 800mAh Rechargeable Pouch Li-Polymer Battery
Leave a Reply